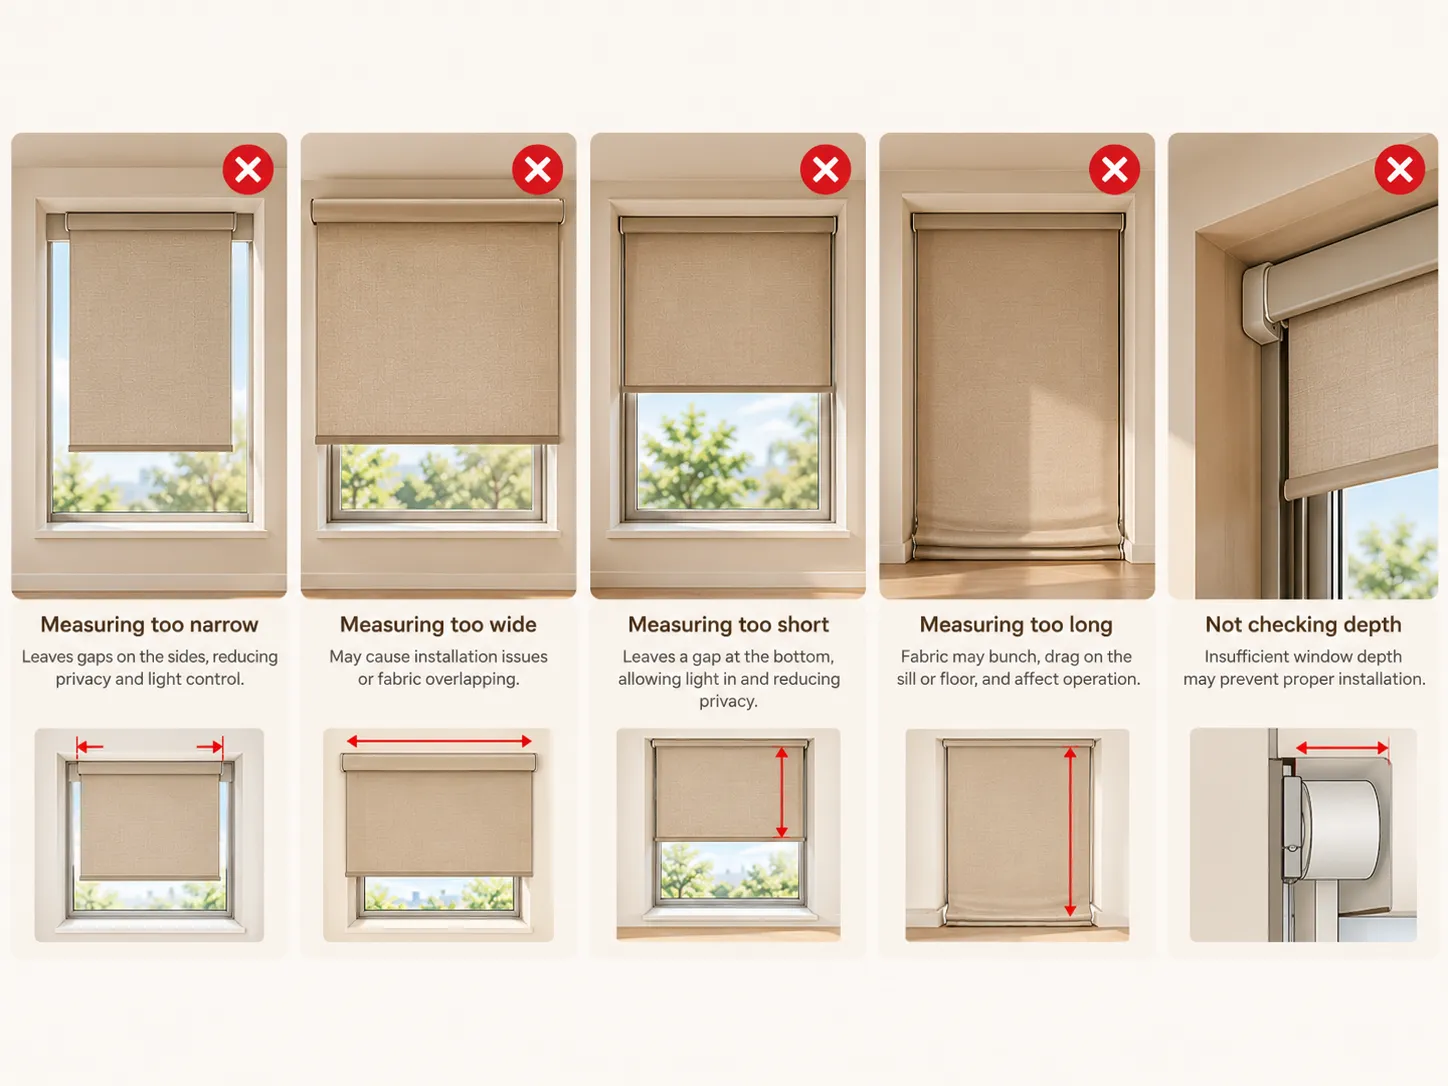
Measure with confidence. Learn how to choose a mount type, record accurate dimensions, understand product sizing, and prepare your window for a beautifully fitted shade.
Choose the installation position before recording final dimensions. It changes the area you measure and the clearances you need to check.
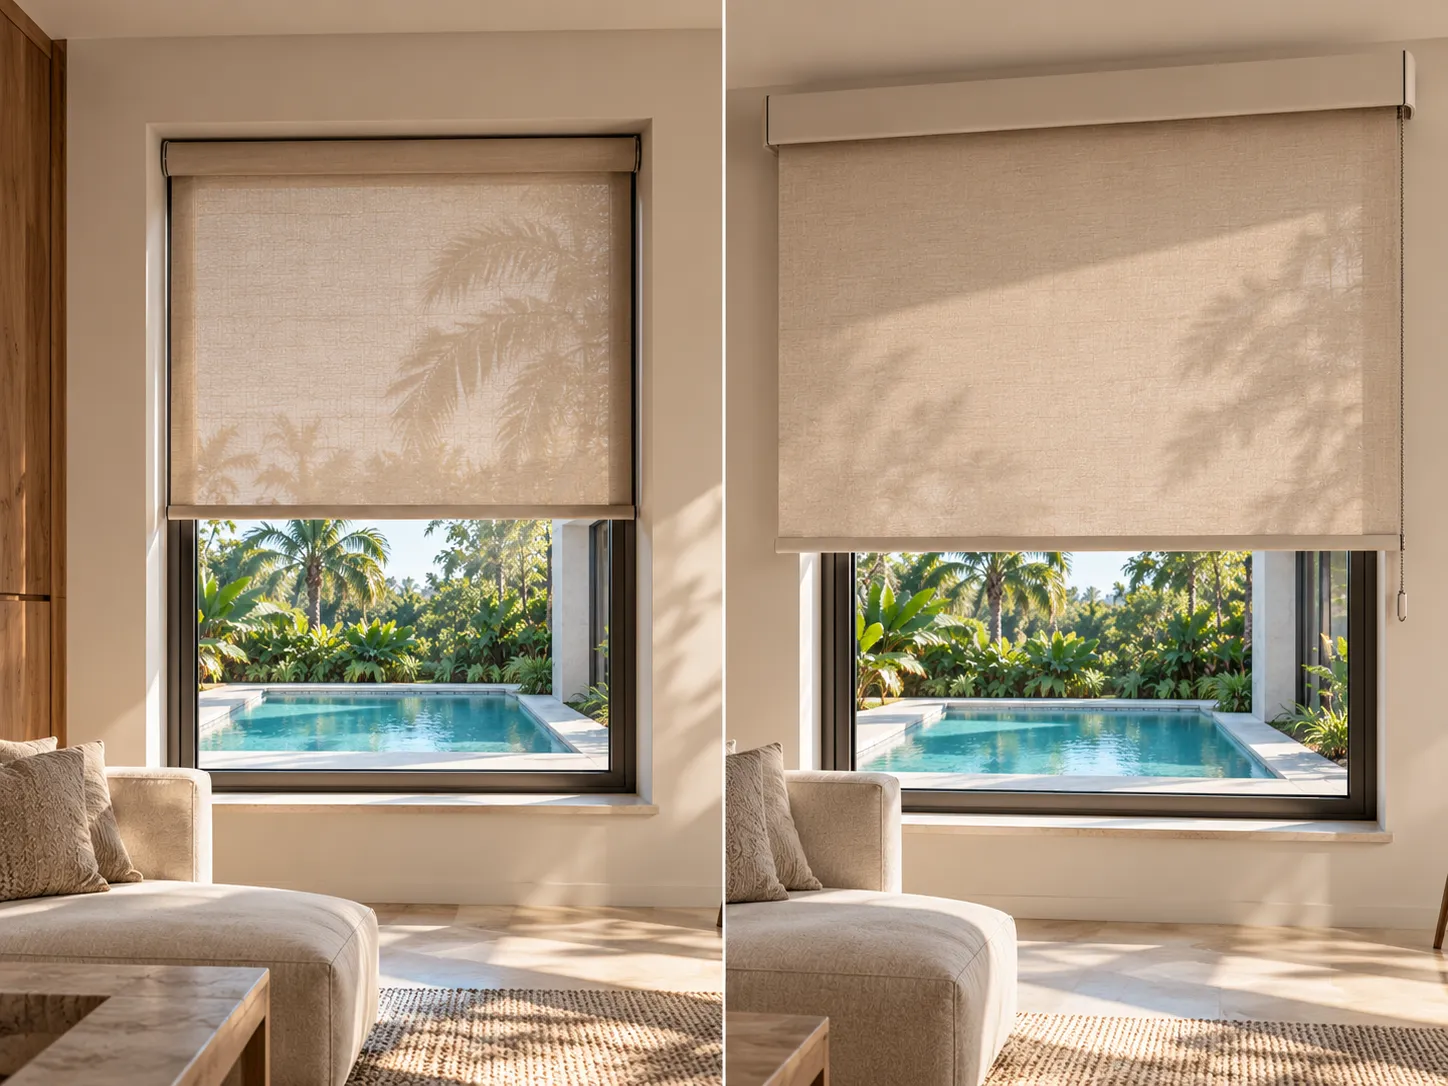
Conceptual illustration. Check the exact product and mounting hardware before ordering.
A
Inside Mount
The shade sits within the window recess for a built-in appearance.
Measure the clear inside opening.
Check usable recess depth at several points.
Check handles, locks, cranks, trim and other obstructions.
Confirm the product’s minimum depth and deduction rules.
Important: minimum depth and any deduction vary by model and hardware.
B
Outside Mount
The shade sits on an approved wall or trim surface outside the recess and covers the area you define.
Mark the intended left, right, top and bottom coverage points.
Check wall space, trim and adjacent windows.
Allow for handles, furniture and nearby obstructions.
Confirm what the supplier means by ordered width.
Planning tip: overlap is a design decision, not a universal fixed amount.
02
CHECK THE RECESS
Measure Window Depth
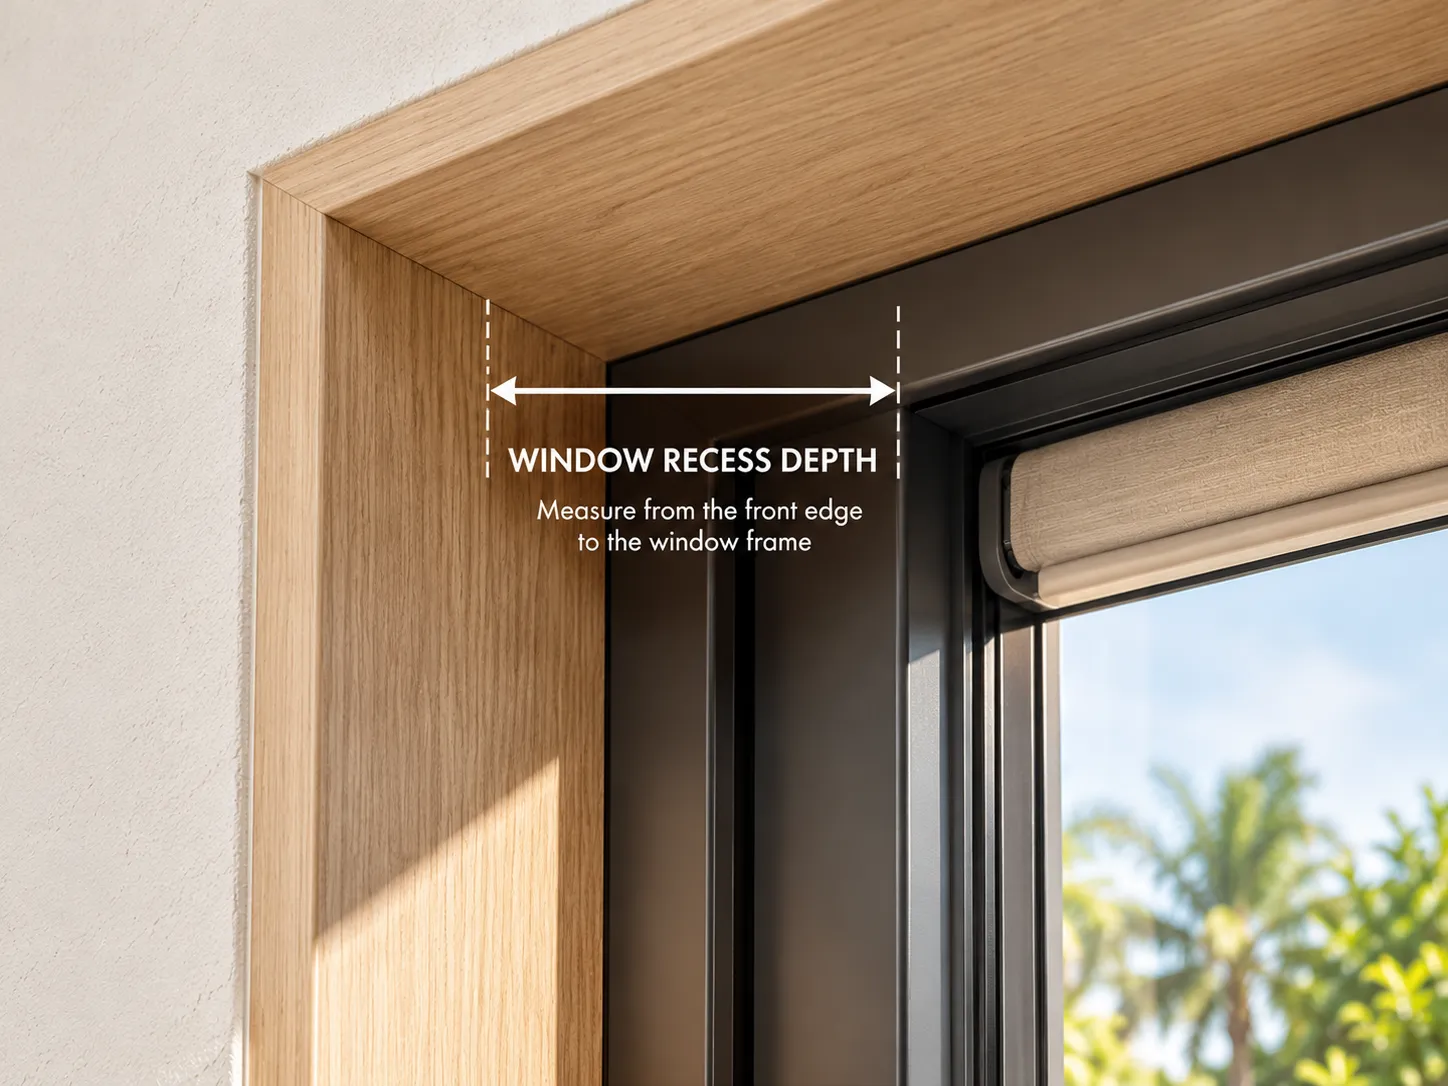
Make sure the chosen shade and brackets can fit and operate without hitting handles, trim or other objects.
Depth diagram — not to scale.
How to check usable depth
Identify the front edge of the recess or trim.
Measure back to the first obstruction or the intended hardware position.
Repeat at the left, centre and right if the recess is uneven.
Compare the smallest usable depth with the exact shade model’s requirements.
Check these obstructions
Handles and locksWindow cranksHingesUneven trimVentsNearby walls
03
HORIZONTAL MEASUREMENTS
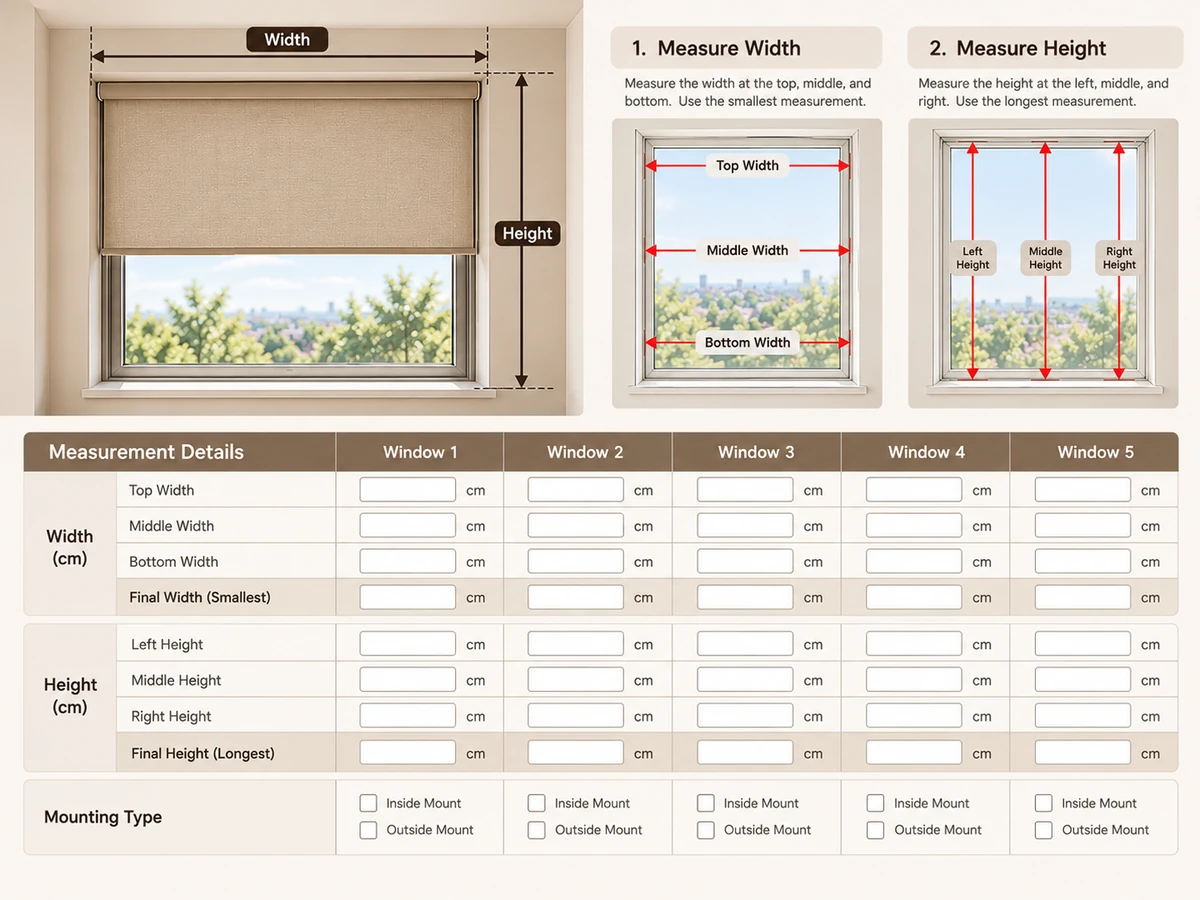
Measure Width at Three Points
Keep the tape straight and level. Record every value before deciding which dimension to submit.
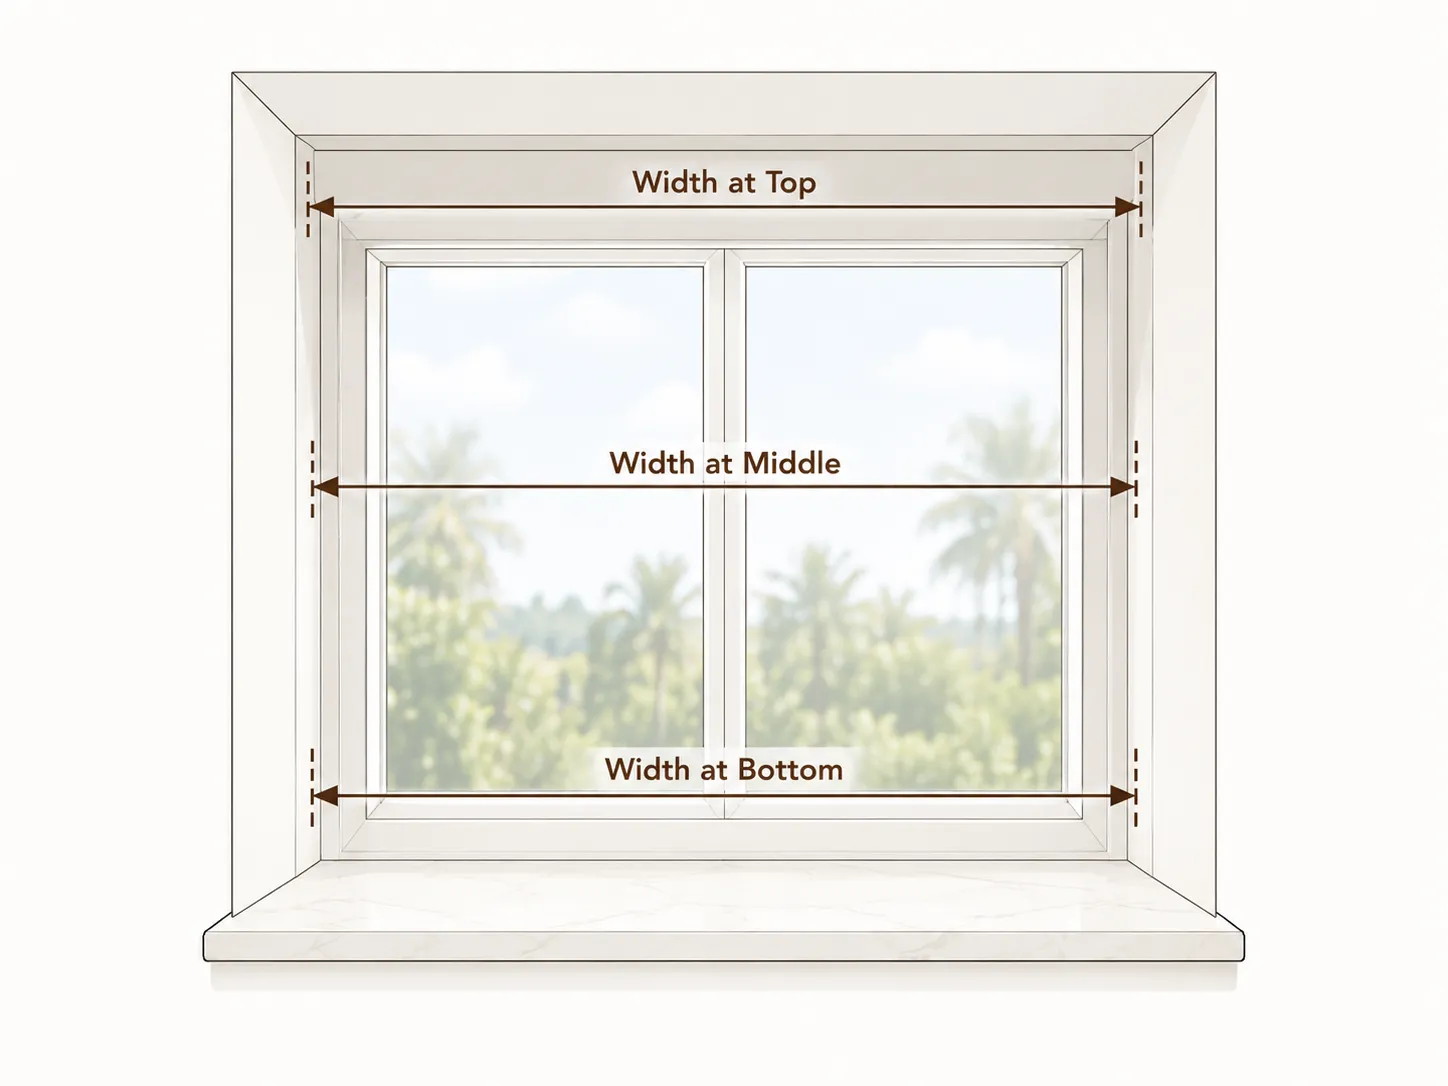
2D technical diagram — front view.
Inside mount
Measure the clear width near the top of the recess.
Measure again across the middle.
Measure a third time near the bottom.
Record all three values in cm or mm.
Use the smallest width as a reference unless the selected product instructs otherwise.
Do not guess a deduction. Submit the opening size or finished size exactly as required by the selected supplier.
Outside mount
Mark the desired left and right coverage edges, then measure the full distance between those marks. Check the planned width against walls, trim, handles and neighbouring shades.
04
VERTICAL MEASUREMENTS
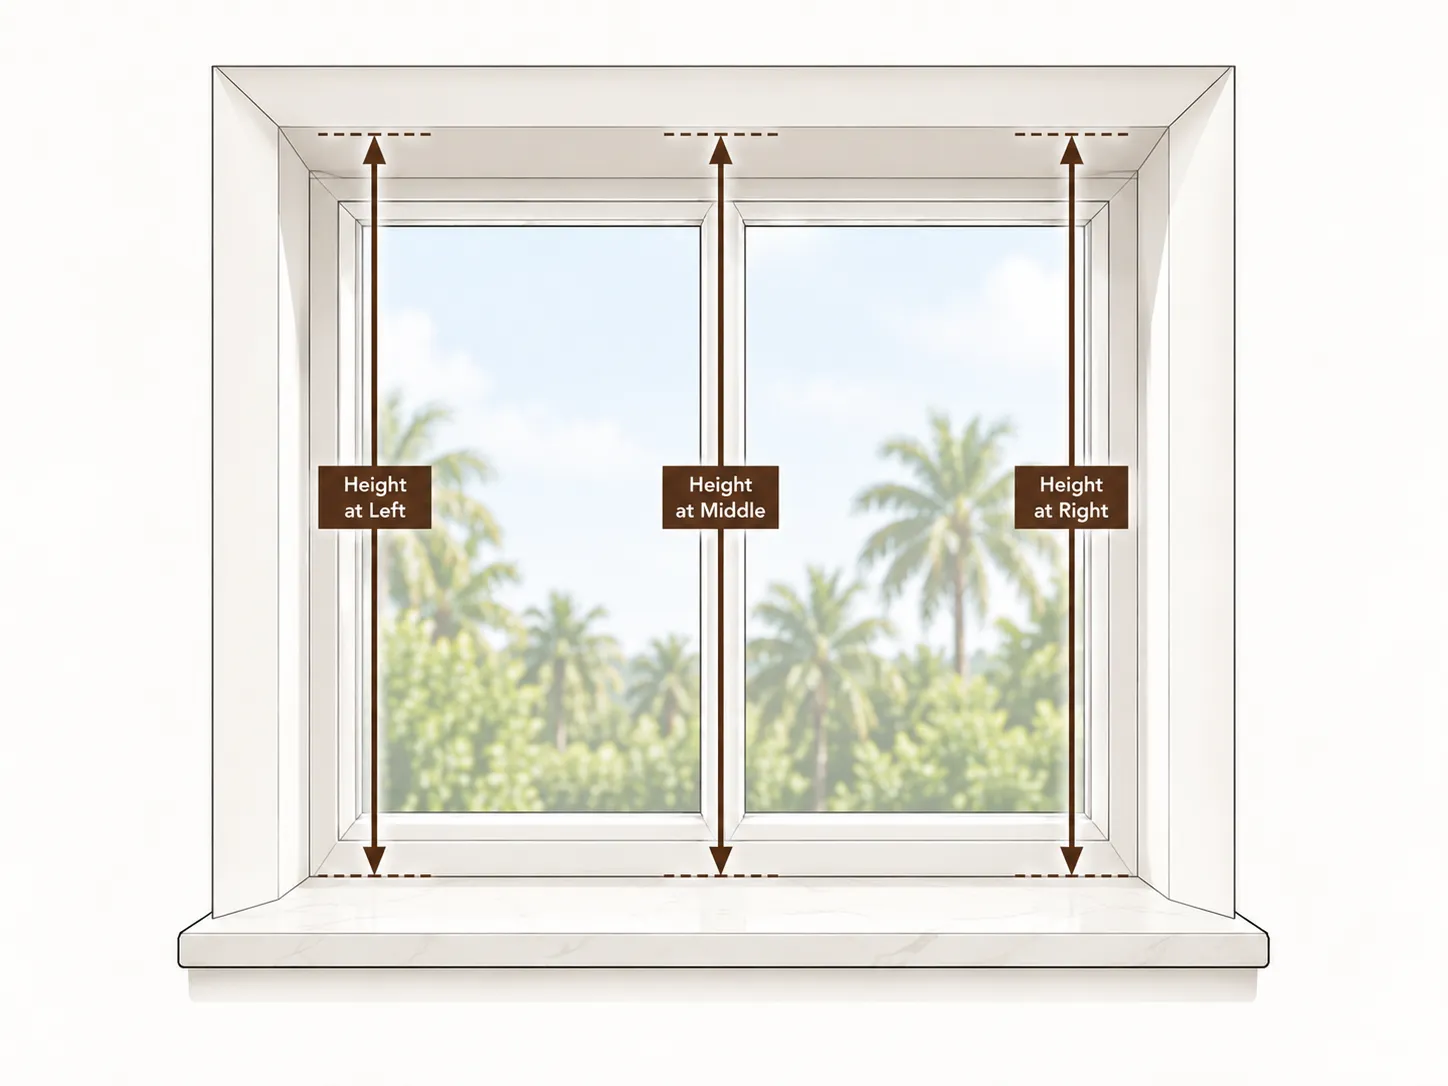
Measure Height at Three Points
Use the same defined top reference and record the height at multiple points to reveal an uneven opening.
2D technical diagram — front view.
Inside mount
Measure the inside height at the left.
Repeat at the centre and right.
Record all three values and use the tallest as a reference unless product instructions differ.
Check the sill, handles and obstructions along the shade’s travel path.
Outside mount
Choose the intended top point for the headrail or shade.
Choose the desired bottom point when fully lowered.
Measure vertically between those two points.
Include any intended coverage over trim or below the window.
05
PRODUCT DIMENSIONS
Understand Product Size Details
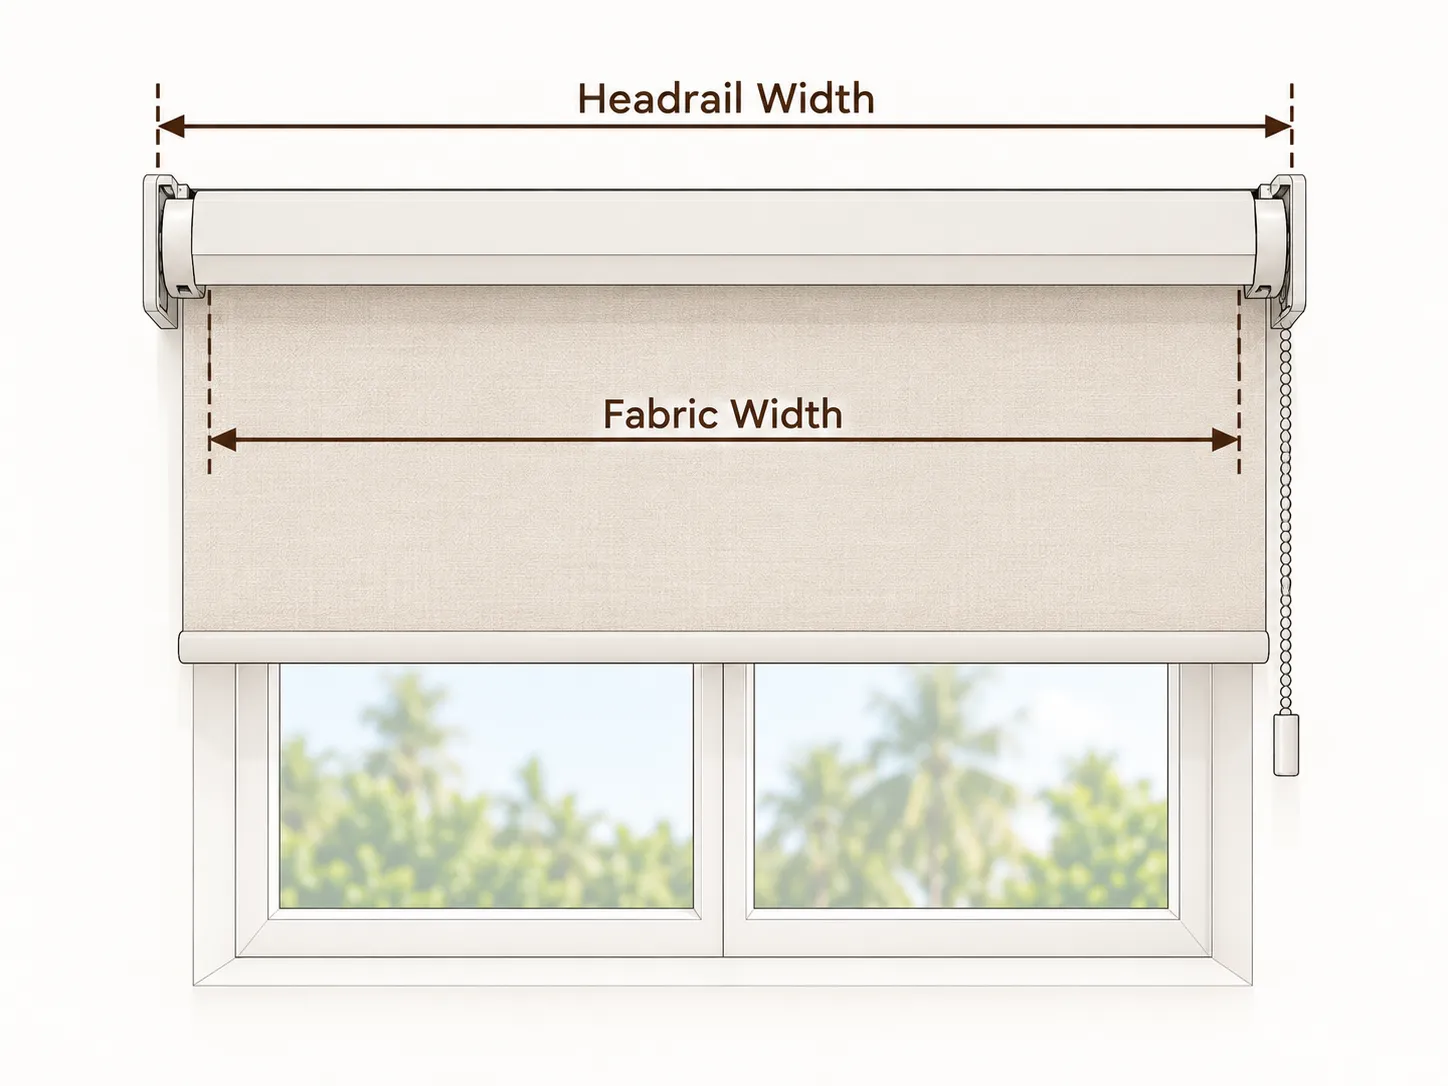
Opening width, coverage width, ordered width, headrail width and fabric width are related — but they are not automatically identical.
Conceptual size diagram. Actual component widths vary by product.
Opening width
The clear width inside the window recess.
Coverage width
The full area you want an outside-mounted shade to cover.
Ordered width
The dimension the supplier asks you to submit.
Headrail width
The width of the top hardware or cassette.
Fabric width
The width of the shade material, which may be narrower than the hardware.
Product-specific rule: never apply one generic deduction to every shade. Check the exact construction, cassette, control type and supplier specification.
06
CHOOSE A PRODUCT
Know Your Shade Type
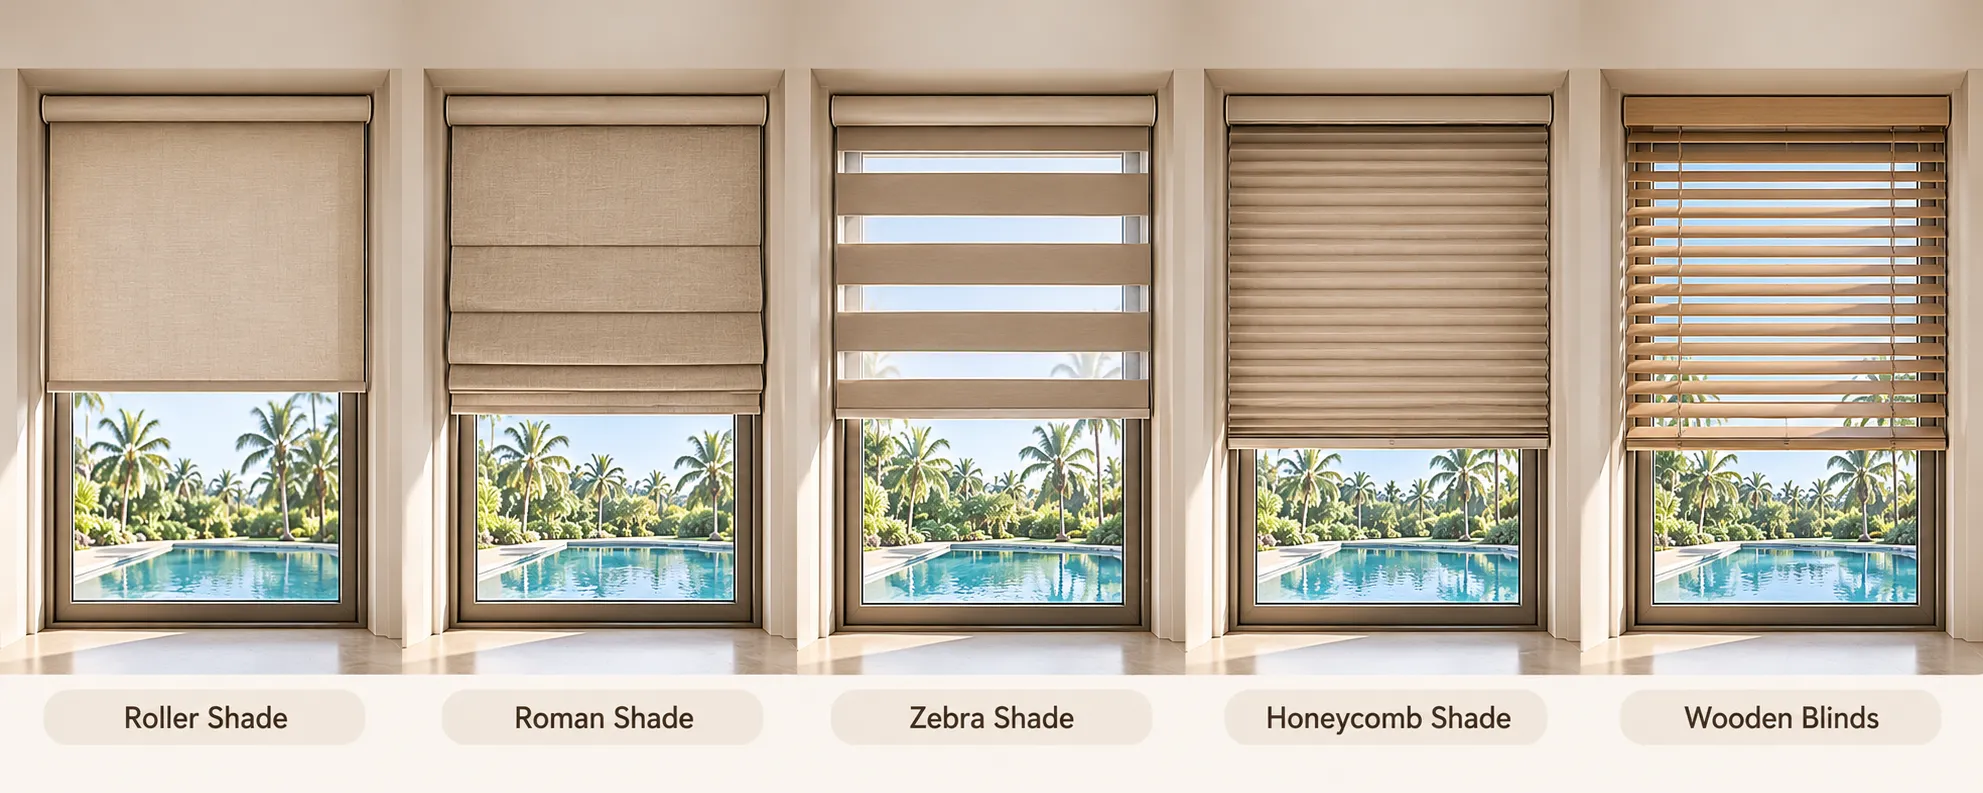
Different constructions may have different depth, clearance, stack and ordering requirements.
Illustrative product families — confirm available models and specifications with Almeers Living.
Roller Shades
Check fabric coverage versus full assembly width.
Roman Shades
Check fold stack, headrail and required depth.
Zebra Shades
Check cassette size and control-side clearance.
Honeycomb Shades
Check cell depth and handle clearance.
Wood / Bamboo
Check headrail, slats and stack height.
07
NON-STANDARD OPENINGS
Special Window Scenarios
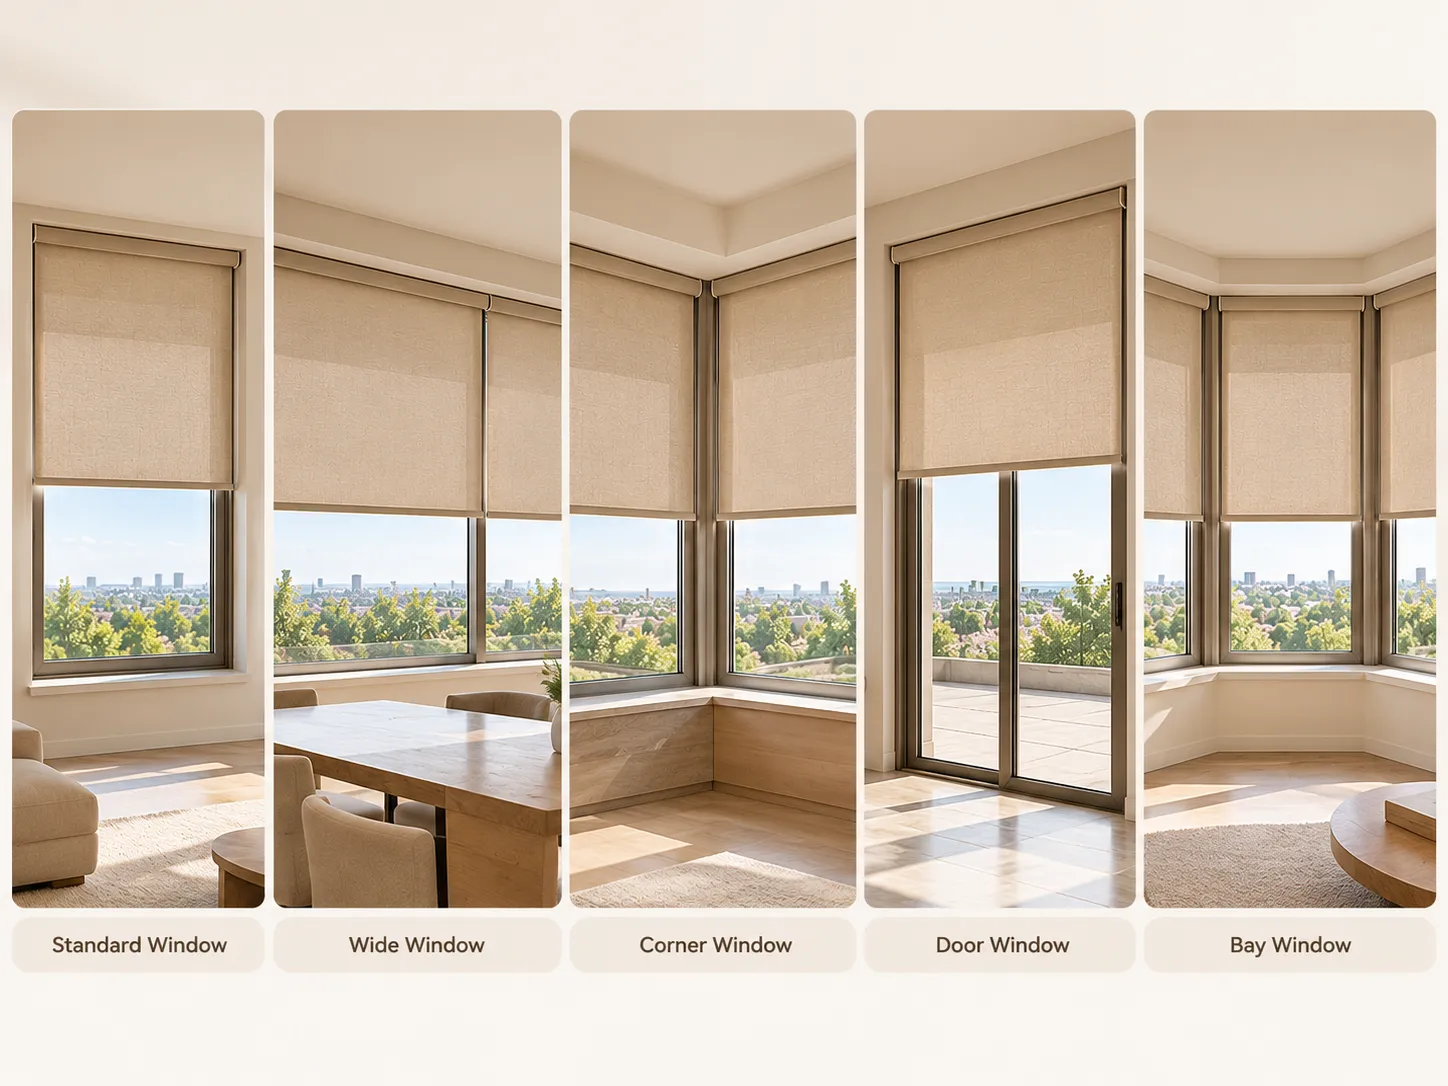
Complex openings often need extra checks. Record each section separately and share photos before ordering.
Scenario illustrations are planning aids, not scale drawings.
Corner and bay windows
Measure each opening separately. Check corner clearance, neighbouring headrails and whether adjacent shades can move freely.
Wide windows and glass doors
Check the supplier’s maximum product width, support requirements, handle movement and whether a single shade or multiple shades are more suitable.
08
QUALITY CHECK
Avoid Common Measuring Mistakes
A few simple checks help prevent incorrect ordering dimensions and avoidable installation issues.
Review each point before submitting a measurement worksheet.
Checklist progress0 of 8 complete
09
SAVE YOUR MEASUREMENTS
Measurement Worksheet
Record one window at a time. The calculated values are references for review, not a substitute for product-specific ordering rules.
Reference worksheet image. Use the interactive form below to calculate reference values and copy a text summary.
Width measurements
Smallest recorded width —
Height measurements
Tallest recorded height —
STEP 10 · FINAL REVIEW
Need Help Confirming Your Measurements?
Share your worksheet, window photos and preferred shade type with the Almeers Living team before placing a custom order.
Should I measure the window or the existing shade?
Measure the window opening for an inside mount or the intended coverage area for an outside mount. Existing shades may have different mounting and deduction rules.
Which width should I use for an inside mount?
Record the top, middle and bottom widths. The smallest width is a common reference, but the selected product’s instructions always take priority. Do not apply an unconfirmed deduction.
How do I measure for an outside mount?
Mark the intended left, right, top and bottom coverage points, then measure between those marks. Check the available wall space, trim, handles and nearby obstructions.
Are headrail width and fabric width the same?
Not always. Ordered size, headrail width and fabric width can differ by shade construction and hardware. Confirm the exact product specification before ordering.
What if the window is not square?
Record measurements at multiple points, note any differences and share clear photos with the supplier or installer before placing a custom order.
Can I use the same deduction for every shade type?
No. Deductions and minimum depth requirements vary by model, headrail, cassette, control system and supplier. Use the instructions for the exact product.